Setting up a small or large website can be very easy. All it takes is some initial planning, Google search abilities and a photo editing tool to get things rolling. WordPress has so many versatile uses for websites and due to its open-sourced design it continually makes strives in improvements in security and plugins and added functionality.
 If you have your own server access through a web host you can install WordPress on that otherwise WordPress.org provides free and paid accounts allowing anyone to get started.
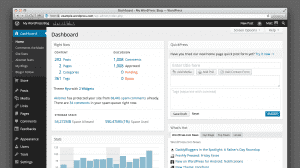
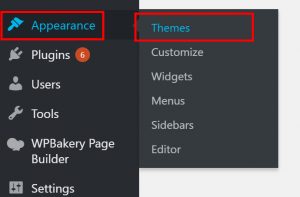
Once you have logged in you will be greeted with your dashboard containing some WordPress new and a menu on the left-hand-side with a link to various options. First, you will need to select a theme and you can do this by navigating to Appearance > Themes. By default, WordPress uses a standard theme which you are more than welcome to use but feel free to browse the huge range of free options. There are also loads of paid options that you can search the internet for and import to your website as well. Once you have made your selection install and active your desired theme.
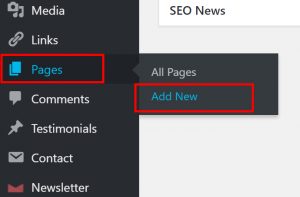
Now it’s time to create come pages. Navigate to the Pages > Add New and you will be presented with a clean page where you can add any content you desire. Basic themes will require you to have an understanding of website coding to be able to add content but there are plugins that you can find through the Plugins > Add New capability that will allow you to create pages via drag and drop editors. Some themes can also come packaged with pre-built pages and visual editors where you can design pages without coding. If you don’t have any coding skills or very basic ones you may need to do some Google research when it comes to adding margins, and possibly other layout options so you know what the setting will result in should you make changes to them. Once you are happy with your page you can publish it to make it visible to web browsers, alternatively, you can save it in a draft if it’s not ready for public viewing.
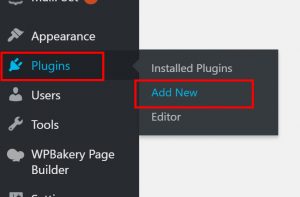
Now that you have your pages created you can add further plugins to allow visitors to share your content through social media. So we will go to our Plugins > Add New page and search for social media share. Make sure that the plugin is first listed as compatible with the version of WordPress you are using and secondly look for something that is updated more recently and shows signs that it is still be updated by its developer. There are also paid plugins that you can find and upload should you desire greater functionality then what is provided by the free plugins. Once you have selected your plugin and installed it navigate to its settings/options which will be added somewhere to the left-hand menu. Go through the settings and make sure you select what you are happy with and click save.
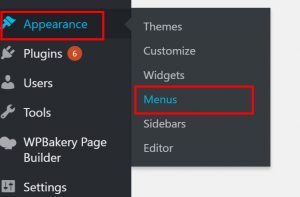
 In order to allow visitors to select pages, we need to create a menu. To do this begin by navigating to Appearance > Menu. If there is a default menu you can use this or create a blank menu using the Create a New Menu option next to the menu selector. If you click on create a new menu you will be prompted to enter in a new menu name and click on Create Menu. Next add your created pages by going over to the middle-left of your page where you will see accordion tabs labelled Pages, Posts, Events, Categories, etc. Make your selections and then click on the Add to Menu button. You can drag and drop the pages to re-order your menu structure. When you are happy with your menu structure click on Save Menu button to publish the structure. Some themes may also have a Manage Locations tab at the top of the menu screen and this will allow you to select the locations on your website where menus can be added.
Once your menu is complete its time to set some settings. Navigate to your website settings by selecting Settings > General. Here you can set your website title, tagline and other settings. Another important settings page is the Reading option. This is where you set what you would like the home page to display such as a static page you have created or your latest posts as well as where your blog page is located if your website has one. If you add other plugins their settings may also be visible as tabs here that you can edit and tweak. Continue through all the settings until you are comfortable with all of them and then your website is ready.
Click on the little home icon on the top of your admin menu and you will be taken to your new website. Now you can make some tweaks based on what you see. I like to have two browser windows open so I can see by backend on once screen and view the results on the other but do what works for you.
Now that you have your basic website setup feel free to explore with other plugins. I have listed a few below to help you get started but there are thousands of options.
Good Luck and have fun!
SOME OF MY FAVOURITE PLUGINS.
Akeeba Backup
Whitelabel CMS
WooCommerce
Yoast
All in one SEO
WP Project Manager
bbPress for forums
Contact form 7
Holler Box
Slider Revolution
AddThis
[/vc_column][/vc_row]